With the experience of working on webparts in SharePoint 2007 & 2010, I started creating a new SharePoint hosted app as soon as I set up my 2013 developer machine & VS 2012. With a little bit knowledge on the solution structure that every script we write should go in to the App.js file, I quickly opened it. Visual Studio, pre-loads the file with a piece of code to display a welcome message with the current logged in user. In an urge to see my app working on the site, I deployed the app.
BANGGG!! Visual studio threw its first error “Apps are disabled on this site“. Digging more in to it, found lot more goes at the configuration before an app can be deployed. Below are the various issues/errors I have faced and the solutions I have found to resolve them to get my app deployed & work successfully.
<<<GOLDEN RULE : Make sure you deploy your app only with an account which is not part of the farm administrators group>>>
“Apps are disabled on this site”
To resolve this issue, you need to configure App URLs in the central Administration. Open Central Administration -> Apps ->Configure App URLs
By opening this page you may end up with the below error.
“The Subscription Settings service and corresponding application and proxy needs to be running in order to make changes to these settings”
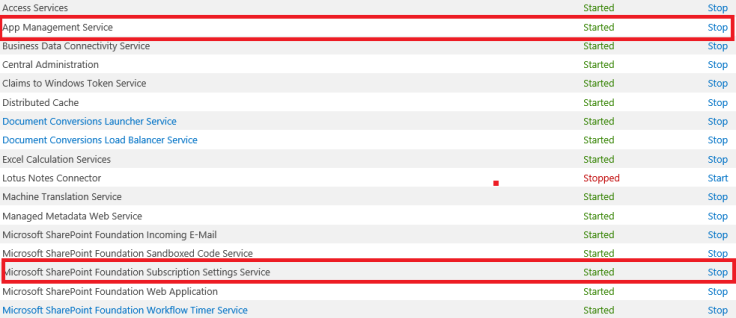
Reason being that app requires below two service application to be created & running.
- App Management Service
- Microsoft SharePoint Foundation Subscription Settings Service
Going to the System Setting -> Manage services on server, I saw both of these services Started & running without any issues.
Further debugging, when I checked the service applications list, I could see only the App Management Service application & not the Microsoft SharePoint Foundation Subscription Settings Service application.
Though App Management Service is created as part of the set-up, you need to create the later one manually. And the trick here is that you need to create it through PowerShell. Below is the commands..
>> $managedAccount = Get-SPManagedAccount “domain\accountname”
>> $appPool = New-SPServiceApplicationPool -Name SubscriptionServiceAppPool -Account $managedAccount
>> $serviceApp = New-SPSubscriptionSettingsServiceApplication -ApplicationPool $appPool -name “Subscription Settings Service Application” -DatabaseName “SubscriptionSettingsDB”
>> $serviceAppProxy = New-SPSubscriptionSettingsServiceApplicationProxy -ServiceApplication $serviceApp
Make sure you are using a managed account in the above snippet to avoid the object reference error. You can register your account as a SharePoint Managed account at Security -> Configure Managed Accounts in Central Administration (Being a dev environment we attempt to use our own domain account for installation/run services applications & app pools/farm administration. But remember the golden rule, don’t deploy app using the farm admin account. I would suggest, use your account only for developing & deploying but another service account to run the service applications & app pools).
Now going back to where we started, Configure App URLs page, I got the below error.
“Settings or services required to complete this request are not currently available. Try this operation again later. If the problem persists, contact your administrator”
An IIS reset solved this issue. Once the page loads successfully, provide your app domain and the prefix details.
The App domain, in the production environment is the one that will be a registered domain with an entry made in to DNS. As of now your deployment adds a host entry like the ones below to enable viewing the app in your local farm.
These steps made sure that my app gets deployed successfully!!
Before you browse your app, some browser level settings needs to be done.
- Add your app domain site to the Local Intranet Sites list. To do this go to IE -> Tools -> Internet Options -> Security -> Local intranet -> Sites & add http://*.appdomain.com (In my case it would be http://*.chanakya.com ).
- If you are in a corporate network and using a Proxy, add your address in exceptions list. To do this go to IE -> Tools -> Internet Options -> Connections -> Lan Settings -> Advanced & under Exceptions add *.appdomain.com.
Now you should be able to browse your app from the site you have deployed. In case your app prompts continuously for credentials, the last step you need to do is to disable the loopback check.
To disable loopback, open the registry and go to HKEY_LOCAL_MACHINE\SYSTEM\CurrentControlSet\Control\LSA and create a new DWORD (32-bit) Value with a name of DisableLoopbackCheck and set the value to 1. Restart the server after the change to ensure it takes effect.
And finally, you should be seeing your app loaded & the welcome message in the page. Now you can start coding your app and just go on pressing the way old F5 to see the changes reflecting in your app 🙂
Do post if you face any other errors you come across in the comments section & Happy APPing 🙂


Good Job Chanakya !
After spoiling my sunday, Finally i got proper steps for the same problem.
This website certainly has all the info I needed concerning this subject and didn’t know who to ask.